Saturday, January 21, 2012

Something is stirring...

I don't know if it's all my friends and family right now that are pregnant...or maybe it's been watching a few friends go through the adoption process...but all I can tell you is that something deep inside of me is stirring. And just to answer any assumptions that you may have up front, no, I am not pregnant! Far from it actually. Let me start from the beginning.

When I was younger, there was a group called The African Children's Choir that used to travel around the U.S. to help raise money to send back to their homes. Most of them had lost both parents in tragedies that we couldn't even fathom. When they would come through Salt Lake, my family used to host a few of the kids. It was only for a few days, but those few days were long enough to make a lasting impression. I remember one particular year it had snowed in the mountains so we took the three girls that were staying with us up to see it. They had never seen snow before in their life and couldn't get enough of the fluffy whiteness that blanketed the ground! Throwing it in the air and at each other and sticking handfuls of it in their mouths, they were absolutely delighted at the snowy surprise! That same year, one of the girls had gotten very attached to my dad and when it was time to leave, all I can remember is that little girl clinging to my dad's neck, crying and not wanting to let go. My dad held her, patting her back and coaxing her to release. But I knew what she wanted was not to let go of the safety and security that she found in my dad's arms. I cried watching, because I knew how good those arms felt. A lasting impression.

I don't know if that's what started this stirring in my young heart, or if God had it planted there all along, but while most little girls played "House" and stuffed a ball up their tummies to pretend like they were pregnant, I was the odd one out who always dreamed of going over to Africa to save the orphans.  It's something that I never grew out of, and I can remember one particular night about 5 years ago when I was going through a hard time {yet another identity crisis}, there were so many unknowns in my life and I was so confused about who I was and what I was supposed to do. I can remember God whispering to me that night as I lay in bed crying to write down the things that I knew, beyond the shadow of a doubt, that he had told me about myself. I began making a list, and on that list was one thing that was outstanding above them all: I was called to be a mother to the motherless. I can remember even writing that phrase down brought me to tears. Typing it now has the same affect. It was a promise that I kept very dear to my heart and buried in the deepest, safest place.

Flash forward a couple years and I'm talking on the phone to a blue-eyed boy from Oklahoma. We're still in the getting-to-know-you stage, discussing dreams we have for our lives, when out of nowhere he says something that makes my heart stop. He begins telling me that he's always felt that God has called him to be a father to the fatherless. He wasn't really sure what that meant, and at that time he took it to mean that he was a father to all the hundreds of teenagers that he was with every week. But I knew better. I just listened, never revealing to him until almost a year later when we were engaged that God had spoken the same thing to me. But in that moment of his confession, I knew that that was the man I was going to marry. I even have it recorded in my journal. Creepy how stuff like that happens, right?! Only God.

Adoption has always been the topic when Matt and I talk about having a family. The alternative {which is, having a baby of our own} rarely if ever comes up as an option. That's not to say that if we had one of our own, that we wouldn't adore and cherish him or her, but it's just to say that our hearts have always been so set on adoption, that it's hard to imagine anything else! Most people have a hard time understanding that.

And here we are, in the present, on January 21, 2012. Today. The dream has been has been in slumber for quite a while, but in the past couple months, has slowly been making it's way to the surface. I don't know what that means for us or a timeline of when it will happen, but I just know that something deep inside me has started stirring. Maybe it's God starting to prepare our hearts for whatever the future holds or maybe it's just a result of all the pregnancy hormones floating around in the air. Whatever it is, I do know that I've started praying for our {future} little ones. Because maybe they are being born today. Because maybe their birth mother needs someone to show her compassion. Or, because maybe they need all the health, love, and compassion that only can be provided by a mother's heart who's half a world away. So instead I pray. I pray for health, love and compassion that comes from the ultimate Father of the fatherless. It's so comforting to have Him on our side and to know that wherever we are, wherever they are, we have someone who loves and cares for our little ones more than we can ever imagine!

So that's where we are folks! In the middle of a big bowl that's being stirred by a much bigger hand! We don't have a timeline, but we do ask that if it ever crosses your mind, that you pray with us!

"Father to the fatherless, defender of the widows - this is God, whose dwelling is holy. God places the lonely in families..."
Psalm 68:5-6

Saturday, January 07, 2012

Piper and I went on a photo excursion today! 
Here's a couple of my favorites! :)


Isn't she the sweetest little thing?!
My next goal is to get Lola to hold still long enough so I can catch some of her!
Happy first week of the New Year! :)

Monday, December 19, 2011

Be still my soul.

Be still my soul. 
And get ready to take a deep breath of fresh air.
This cd....


....is now in my possession.
Timing couldn't be any better.
And here's a sample for your listening pleasure.


Saturday, December 17, 2011

Christmas on a Budget II: DIY Recipe Card/Photo Holder

Here's yet another gift giving idea! This sweet little craft can be used for lots of things {photo holder, love notes, daily reminder}, but I think I especially like the idea of using it as a recipe card holder! The great thing about it is you can use the leftover wood and paint from your letter art decor to make this! 

Here's what you'll need!

  • Furniture Dowel Rod Cap {I found mine in the wood section at Hobby Lobby - 3 for $1.47}
  • Clothes Pins {Also in the wood section at Hobby Lobby - 24 pack for $3.47}
  • Furniture Tacks {Near the material section at Hobby Lobby - 1 pack of 180/$2.21}
  • Burlap or Scrapbook paper {Burlap can be found in any material store - About $3.99/yard. You will only need about 1/8 yard for this project.}
  • Piece of wood {Like I said, I used leftover wood. Mine was a 2x10 and 8" long. If you need it cut, Home Depot will cut it for you.}
  • Spray paint {For this one, I used Satin Red Garnet by Valspar. I plan on using Dark Walnut on another project.}
  • Spray adhesive
  • Hot glue gun
  • Sand paper {optional}


1. Cut your wood to the size you want. Mine was 8" long. Spray paint wood, dowel rod cap and clothes pin. Let dry.
2.{Optional} After paint dried, I used sand paper to sand the edges of the project to create a rustic look. Just a preference....but I think it adds character! :)

3. Use a hot glue gun to glue dowel rod cap to top of board.
4. Cut piece of burlap about 1" smaller than board. Spray with spray adhesive glue and place in center of board.

5. Use a hammer to nail furniture in all four corners of board. This is just an extra assurance to hold the burlap onto the board. And once again, I think it adds character! ;)
6. Use a glue gun to attach clothes pin to top of board.
7. I used some extra burlap to create a cute little flower for the bottom of the board. You can find a great tutorial on how to do that here! I wanted my flower to have a little more depth, so I sprayed a little bit of my paint on a newspaper, dipped a wadded up paper towel in the paint and sponged it on to the burlap flower. I LOVE how it turned out!! I then used a glue gun to stick it on the bottom right corner of the board.

Ta-da!! So fun and easy! I got this idea from shanty-2-chic. There's tons of other variations of this craft and plenty of ways to make it your own!  If we break down the cost and round up, all-in-all it was about $7.00 to make the entire project! Not too shabby! :)

Wednesday, December 14, 2011

Reflections

So I just realized I had forgotten to post this after I wrote it...oops! My B! Haha! So please pardon the time lapse as you read some of my ramblings! :) Oh and also, please excuse this picture of Piper....she wanted to get in on today's blogging action!


It's the day after Thanksgiving and I'm feeling as turkey-hungover as ever!! Somewhere between my bed and the living room couch, all motivation ceased to exist! So today has been filled with lots of time with Piper and Lola {my two sweet puppies} and old, girly, romantic movies....the kind I can only watch when I'm either alone or in the company of another girl! My special guests were Judy Garland and Tom Hanks. Romance was going strong!

Matt and I were able to celebrate Thanksgiving twice this year, once with my family last week and again with his family yesterday. We both feel incredibly blessed to have such great support groups!! So, in the order of Thanksgiving traditions, I thought I would talk about the thing for which I'm most {very} thankful for! I'll give you one guess....it starts with "M" and ends with "att"?!  Our first year of marriage brought so many unexpected twists and turns....some that would tear most couples apart, but I can honestly say that I have never felt closer to this wonderful man! I read something today that said, "The couples that are meant to be are the ones who go through everything designed to tear them apart and come out even stronger than they were before." I really couldn't agree more.  I think today's society enter into marriage so lightly that when the bumps in the road do come, they automatically assume it's the other person's fault and jump ship. Definitely not what God had in mind when he designed marriage. Marriage is a team effort and some days you have to make a choice to love the goopy-eyed, vermon breathed, frizzy haired mess that's laying next to you {poor Matt....Sleeping Beauty wasn't my favorite princess for a reason!}. Anyway, today I was reading some of Matt and I's first emails to each other. They contained all the usual get-to-know-you questions along with a few epiphanies and dreams. We had the world figured out and our lives all planned...funny how much we DIDN'T know! Haha! I think if anything, these past couple years have taught me how to "let go and let God". Granted, I'm still in the middle of learning that and there's been plenty of kicking and screaming along the way, but I am learning. Nothing panned out like we had planned, but we can only put our hope in the fact that God does have our best interest in mind and he is faithful. Some days it's easier to do that than others, but luckily when one of us is feeling down the other is there to help bring the other one up. We're a team. And a pretty good one at that! ♥


Sunday, December 04, 2011

Christmas on a Budget: DIY Letter Art Decor

So I stumbled upon this blog on none other than the oh-so-awesome, Pinterest! I truly am addicted and inspired by that whole site! Anyway, with our finances this year, Matt and I are having to be very careful about every little penny, so that makes Christmas gifts a little tricky! Enter Shanty-2-Chic. This is seriously the cutest blog and I've gotten so many craft ideas from there {a couple which I will use in the next few weeks}! Here's today's project that will end up in the loving home of my mom & dad {they have received strict instructions not to look at my blog until after Christmas!}!

Here's what you'll need:
2x10 Board {We bought ours at Lowes. The original length was 8' but for my project we cut it down to about 35". I'll be using the rest for other projects.}
Spray paint {For the spray paint and board, both of which can be used on other projects, the cost was about $15.}
4x6 Photo frames {I found mine at Dollar General for $1.50 each}
Hot glue gun
Photos {Here's a flickr site that gives literally hundreds of options for letter art for FREE that you can print off on your home computer...yayyy!!!}
Sand paper {Optional...only if you want to create an antiqued look}


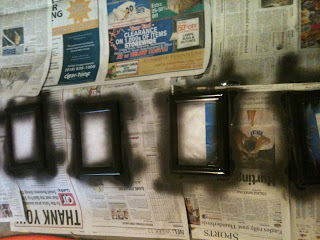
Here's my frames! I decided to spray paint them a dark walnut color, but before doing that, remove the glass, if possible. The glass in my frames wouldn't come out without breaking the entire frame, so you can either tape off the glass or slide a piece of paper in between the glass and and frame. I tried both and sliding the piece of paper worked much better. But don't worry...if you do end up getting some paint on the glass, it can be easily scratched off with a toothpick.

Make sure you lay something underneath the frames before you spray paint. I used two coats of paint. Do the same thing with the 2x10. Be sure one side is completely dry before flipping it over. I used Satin Red Garnet by Valspar for my board. It turned out a really pretty barn red.  After my board dried, I used sand paper on the edges to give it an antiqued look.


After frames have dried, remove the holder from back of frames. This will make it easier to glue it to the board. 

Cut and insert the 4x6 pictures that you printed off into the frame. I turned all of my pictures into black and whites.
Lay out and measure the frames on the board. Mine were 2" away from the outside right and left edges and about 3/4" away from the top and bottom.  I spaced my frames 1" apart from each other.  Then use glue gun on all four corners and press on board. 


And there you have it! A wonderful and personalized Christmas gift! You can read Shanty-2-Chic's how-to here. Let me know if you end up making one for yourself! :)

Monday, November 07, 2011

DIY Photo Prop // Mantel Decor

As the holidays approach, I can feel all things crafty swelling up inside of me!! Here's a little project I worked on this weekend and I'll admit, I feel a little silly posting it because it really is so simple, but I guess that's what I love most about it! The best part is that it can double as holiday decor! So first things first, here's what you'll need:


Mod Podge {But really, what craft project doesn't need it?!}
Scrapbook Paper
Cardstock paper {About 3 sheets}
Letter cut outs {I found mine here. They're about 3x3 inches}
Ribbon or Twine {Approx. 6 ft in length}
Scotch tape {Sorry, forgot to include those in the picture!}
Scissors
  • Step One: Cut out the letters and trace on to cardstock paper and scrapbook paper. Cut out.
  • Step Two: Use the mod podge {or any other glue you have on hand} to glue the cardstock and scrapbook paper together. The letters need to have some kind of weight to them in order for them to hang right on the ribbon. Let dry.
  • Step Three: Cut ribbon to desired length. I had about 13 letters and used approximately 6 ft of ribbon. My ribbon was 3/8" in length.
  • Step Four: Turn papers over so front of letter is facing down.  Use tape to connect ribbon to letters. {Shown below}

Ta-da! Hanging letters! And now you have a re-usable photo prop that doubles as an adorable mantel accessory!  Matt and I used this in a photo shoot we did for the oh-so-darling Chang family this weekend! I'm think it will look great hanging below the mantel this holiday season!


And please don't mind the naked mantel, we're in the middle of re-decorating/renovating our in-laws living room so the mantle hasn't quite yet had the TLC that it deserves! But here's something to give you an idea of what it might look like! I'm thinking this idea will come in handy for baby showers!

Related Posts Plugin for WordPress, Blogger...